


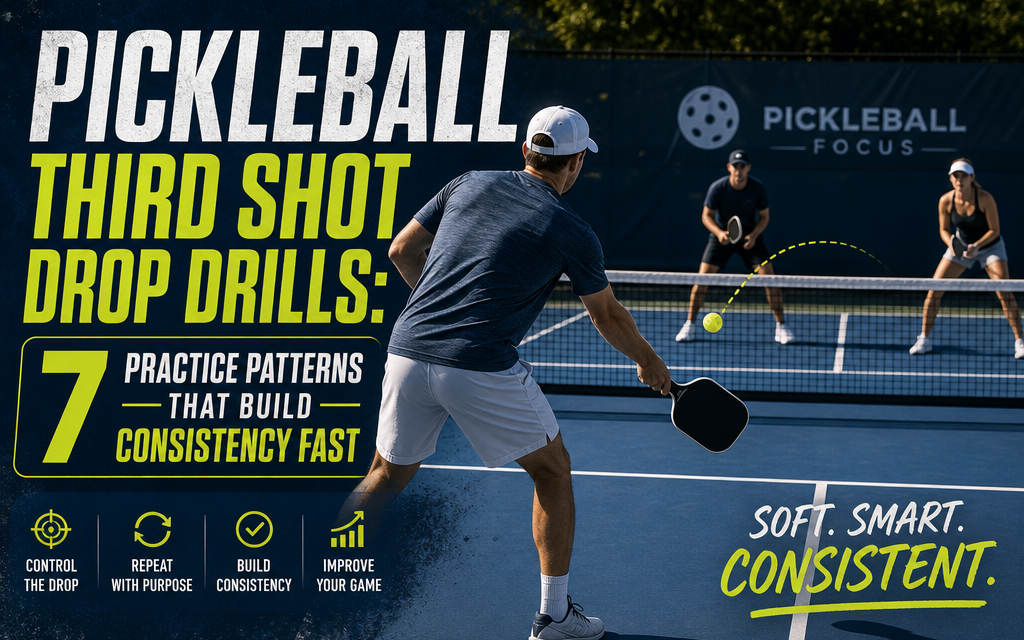
Pickleball Third Shot Drop Drills: 7 Practice Patterns That Build Consistency Fast
Last updated: May 22, 2026
Quick Answer
Pickleball Third Shot Drop Drills: 7 Practice Patterns That Build Consistency Fast are structured, repeatable exercises that progress from static self-feed patterns to pressured, game-like situations. The most effective drills include solo baseline-to-kitchen targeting, cross-court partner feeds, walking-in transition patterns, scored pressure games, court-mapping challenges, topspin wave-motion practice, and asymmetric point play—each building specific aspects of drop consistency, touch, and decision-making under realistic conditions.
Key Takeaways
- Self-feed baseline patterns establish foundational touch and trajectory by hitting 20-30 drops per set into the kitchen from a stationary position
- Cross-court partner drills build adjustment skills for varying depth, pace, and side-to-side consistency on both forehand and backhand
- Walking-in transition patterns train drop quality from any court position while reinforcing the tactic of moving forward after each successful drop
- Scored pressure drills (like the 10-point “don’t hit the net” game) add competitive stress and help identify specific weaknesses
- Court-mapping patterns with nine targets expose where your drop breaks down and build adaptability across all court positions
- Topspin wave-motion drills teach an aggressive third shot drop that creates a higher-margin, more penetrating ball
- Asymmetric point-play games (7-11 format) simulate real match pressure while giving focused repetition on the third shot
What Exactly Is a Third Shot Drop in Pickleball?
A third shot drop is a soft, arcing shot hit from the baseline (or mid-court) that lands in the opponent’s non-volley zone (kitchen), typically executed after the serve and return. It’s the third shot of the rally—serve, return, then drop—and serves as the primary tactic for the serving team to neutralize their positional disadvantage and safely advance to the net.[1]
Unlike a hard drive or lob, the third shot drop uses a low-to-high swing path with controlled pace, aiming to clear the net by 2-4 feet and drop softly into the kitchen. This forces opponents to hit up from below net height, preventing aggressive attacks and buying time for the serving team to move forward into better court position.[7]
Key characteristics that define a proper third shot drop:
- Trajectory: High enough to clear the net safely but low enough to land short in the kitchen
- Pace: Soft touch with minimal power, relying on arc rather than speed
- Spin: Often includes topspin to help the ball drop quickly after clearing the net
- Purpose: Neutralizes the opponent’s advantage at the net and allows safe forward movement
How Is Third Shot Drop Different From a Regular Soft Shot?
The third shot drop is distinct because it occurs at a specific tactical moment—immediately after the return—and must cover the full court distance from baseline to kitchen while the hitting team is out of position. Regular soft shots (like dinks or resets) typically happen when both teams are already at the kitchen line and require much less distance and arc.[1]
Three critical differences:
- Distance: Third shot drops must travel 30+ feet from baseline to opponent’s kitchen; dinks travel only 14-15 feet across the net
- Timing: Executed while moving forward from a defensive position, not from a stable kitchen-line stance
- Consequence: A poor third shot drop gives opponents an easy put-away opportunity; a poor dink from the kitchen is less punishing
The third shot drop also demands different mechanics—more leg drive, fuller swing path, and precise contact point—compared to the compact, wrist-driven motion of a dink. Players who confuse the two often hit drops too flat or too short, resulting in balls that sit up for opponents to attack.[3]
Which Drills Improve Third Shot Drop Accuracy Fastest?
The self-feed baseline kitchen-target pattern and scored pressure games improve accuracy fastest because they provide high-volume repetition with immediate feedback. In self-feed drills, players stand at the baseline with a basket, drop a ball in front, and hit 20-30 consecutive drops aiming for targets placed in the opponent’s kitchen, tracking success rate after each set.[1]
Why these drills accelerate accuracy:
- Volume: 100+ repetitions per 15-minute session groove muscle memory faster than sporadic rally practice
- Feedback loop: Immediate visual confirmation (ball lands in/out of target zone) allows instant correction
- Isolation: Removes variables like opponent pace or spin, letting you focus purely on your swing mechanics and touch
The 10-point scored pressure drill adds competitive stress: start at 10 points, partner feeds from the kitchen, and you score +1 for good drops, -1 for balls too deep or easy to attack, and -2 for net errors. Win at 20 points, lose at 0. This format forces you to prioritize clearing the net while maintaining kitchen depth, and the scoring reveals patterns (e.g., you miss more on backhand or when rushed).[2]
Fastest progression sequence:
- Week 1-2: Solo self-feed, 3 sets of 30 balls, track kitchen percentage
- Week 3-4: Add cross-court partner feeds with varied pace
- Week 5+: Integrate scored pressure games and point-play drills
What Are Common Mistakes Beginners Make With Third Shot Drop?
Beginners most often hit the ball too late (behind the body), use too much grip pressure (creating tension and inconsistent contact), and fall backward instead of moving forward through the shot. These three errors account for the majority of drops that either hit the net or sail long past the kitchen.[7]
The five most common technical mistakes:
- Tight grip (8-9/10 pressure): Reduces feel and causes the paddle to deflect unpredictably; optimal grip is around 6/10
- Contact point behind the body: Forces an upward scoop motion instead of a controlled arc; contact should be out in front
- Hitting the ball on the way down: Creates a flat trajectory that either nets or goes long; contact on the rise after the bounce gives better control
- No forward momentum: Standing flat-footed or leaning back robs power and makes it harder to reach the kitchen; small steps forward through contact are essential
- Aiming for perfection over consistency: Trying to drop the ball on the kitchen line instead of safely into the zone leads to more net errors[2]
Quick diagnostic: If you net more than 30% of your drops, your contact point is likely too low or too far back. If more than 20% sail deep, you’re contacting too late or using too much arm swing without enough arc.
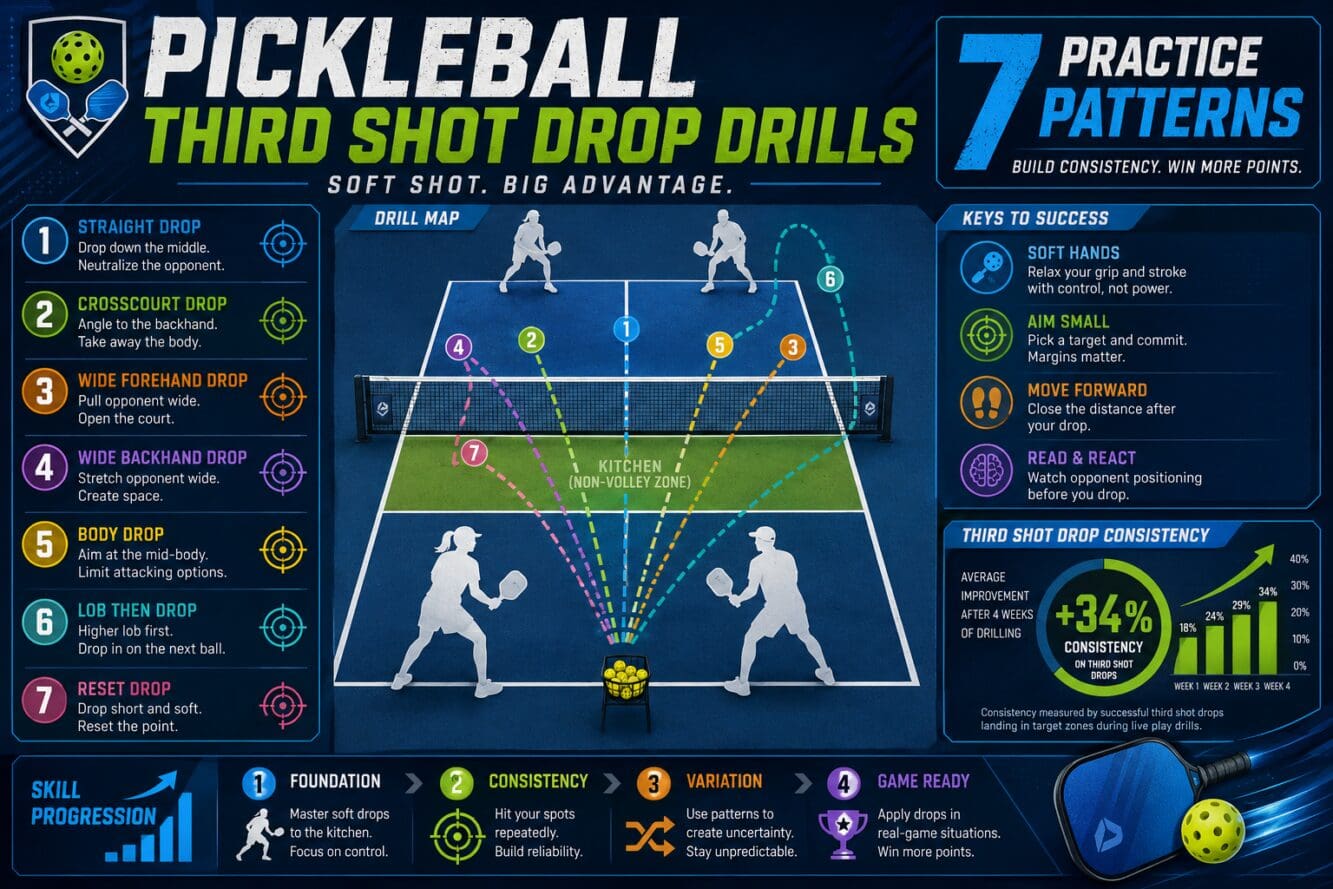
Pickleball Third Shot Drop Drills: Pattern 1 – Solo Baseline Kitchen Target
Stand at the baseline with a basket of 20-30 balls and a target (cone, hoop, or towel) placed in the center of the opponent’s kitchen. Drop a ball in front of you, let it bounce, then hit a third shot drop aiming to land on or near the target. Repeat for the entire set, tracking how many balls land in the kitchen.[1]
Setup and execution:
- Position yourself 1-2 feet behind the baseline in the center
- Hold 2-3 balls in your non-paddle hand or use a ball hopper beside you
- Drop the ball so it bounces waist-high in front of your lead foot
- Use a low-to-high swing with a 6/10 grip pressure
- Aim for an apex 3-4 feet above the net, landing deep in the kitchen
Progression milestones:
- Beginner: 10 of 20 balls in the kitchen (50%)
- Intermediate: 15 of 20 (75%)
- Advanced: 18+ of 20 (90%+)
This drill builds the foundational feel for arc, pace, and paddle angle without the distraction of an opponent’s pace or spin. Once you hit 70% consistency, move the target to different kitchen zones (cross-court, down the line) to add directional control.[1]
Pickleball Third Shot Drop Drills: Pattern 2 – Cross-Court Partner Feed
One player stands at the baseline, the other at the opposite baseline hitting deep cross-court feeds with moderate pace. The baseline player alternates hitting forehand and backhand third shot drops into the partner’s kitchen. After 10 drops from each wing, switch roles.[1]
Why cross-court feeds are essential:
- Realistic pace: Mimics the speed and depth of an actual return of serve
- Side-to-side movement: Forces you to adjust footwork and paddle angle for both wings
- Depth variation: Partner can mix shallow and deep feeds to challenge your adjustment skills
Key coaching cues during this drill:
- Keep your shoulders turned and step into the ball with your lead foot
- Contact the ball while it’s rising, not at the peak or on the way down
- Use your legs to generate lift; don’t rely solely on arm swing
- Aim cross-court (safer angle) before attempting down-the-line drops
Common mistake to avoid: Rushing the swing because you see the ball coming fast. Let the ball come to you, set your feet, then execute the drop with controlled tempo. If you’re netting more than 2 in 10, slow your swing and focus on a higher apex.[2]
Pickleball Third Shot Drop Drills: Pattern 3 – Walking-In Transition Zone
A partner stands at the kitchen line and feeds balls continuously while you start at the baseline and hit a drop. After each drop, take 2-3 steps forward and hit another drop from the new position. Continue moving forward until you reach the kitchen line, hitting drops from every distance.[1][9]
This pattern teaches two critical skills:
- Distance calibration: You learn how much arc and pace are needed from the baseline vs. mid-court vs. transition zone
- Movement timing: Reinforces the tactic that you should move forward immediately after a good drop, not wait to see the result
Execution sequence:
- Start at baseline, hit drop, move forward 2-3 steps
- Hit another drop from the new position (around the service line)
- Move forward again, hit from mid-transition zone
- Continue until you’re at the kitchen line
- If you miss (net or too deep), return to baseline and start over
Variation for advanced players: Have the kitchen-line partner attack any ball that bounces above net height, forcing you to keep every drop low and soft even while moving. This adds defensive pressure and simulates real match conditions where opponents punish weak drops.[4]
Pickleball Third Shot Drop Drills: Pattern 4 – Scored Pressure Game (10-Point Format)
Start with 10 points. A partner at the kitchen line feeds balls continuously while you attempt baseline third shot drops. Scoring: +1 point for a good drop (lands in kitchen, forces opponent to hit up), -1 point for a drop that’s too deep or easy to attack, and -2 points for hitting the net. Win when you reach 20 points; lose if you drop to 0.[2]
Why this drill builds consistency fast:
- Pressure simulation: The scoring creates stakes, mimicking match tension
- Penalty structure: The -2 for nets teaches you to prioritize clearing the net over perfection
- Self-diagnosis: Tracking your score reveals specific weaknesses (e.g., you lose points fastest on backhand or when rushed)
Strategy tips:
- Early in the game (10-15 points), focus on safe, high-arc drops to avoid -2 penalties
- As you approach 18-19 points, you can take slightly more risk for better placement
- If you drop below 5 points, reset your mechanics: slow down, check grip pressure, and prioritize net clearance
Advanced variation: Add a second phase where the partner stands inside the kitchen (illegal in a real game) and volleys aggressively for the first 5 feeds, then backs out to the legal position. This creates extreme pressure and forces you to hit even softer, more precise drops.[5]
Pickleball Third Shot Drop Drills: Pattern 5 – Nine-Point Court Mapping
Mark nine spots on your side of the court: three at the baseline (left, center, right), three at mid-court, and three just behind the kitchen line. A partner stands at the opposite kitchen line. You move through all nine spots in sequence, hitting one drop from each position. Any miss sends you back to spot one.[4]
What this pattern exposes:
- Weak zones: Most players discover they struggle from specific spots (e.g., deep backhand corner or short forehand)
- Transition-zone gaps: The mid-court positions are often the hardest because the ball arrives faster and you have less time to set up
- Directional control: Hitting from different angles forces you to adjust aim and paddle face
Execution rules:
- Start at baseline left, hit a drop into partner’s kitchen
- If successful, move to baseline center; if you miss, stay and repeat
- Continue through all nine spots in order
- Once you complete all nine without a miss, reverse the sequence (kitchen line back to baseline)
Make it harder: Allow your partner to attack any ball above net height. This adds defensive pressure and forces you to keep every drop low, even from short positions where it’s tempting to hit flat.[4]
Pickleball Third Shot Drop Drills: Pattern 6 – Topspin Wave-Motion Practice
This drill teaches an aggressive third shot drop using a sideways wave motion to create topspin. Start with the paddle head low, brush up the back of the ball with a rising motion, and finish with the paddle over your opposite shoulder. The topspin helps the ball drop quickly after clearing the net, creating a higher-margin shot.[3]
Three-phase progression:
- Net-brush drill: Stand 5 feet from the net, toss a ball gently, and brush up the back with a wave motion, aiming to barely clear the net and land in the kitchen. Focus on feeling the spin.
- Baseline partner drill: Partner feeds from the opposite baseline; you execute the full topspin drop motion, emphasizing the low-to-high brush and over-the-shoulder finish.
- Self-feed pattern: Drop balls in front of yourself at the baseline and repeat the topspin motion for 20-30 reps, tracking kitchen percentage.
Key technical cues:
- Start with the paddle head below the ball at contact
- Brush up the back of the ball, not through it
- Finish with the paddle over your opposite shoulder (right-handers finish over left shoulder)
- Use a loose wrist to generate spin; a stiff wrist kills the brush effect
This pattern is especially useful for players who consistently net their drops because the topspin allows a higher net clearance (3-5 feet) while still bringing the ball down sharply into the kitchen.[3]
Pickleball Third Shot Drop Drills: Pattern 7 – Asymmetric Point Play (7-11 Game)
One player starts at the baseline (practicing third shots), the other at the kitchen line. Play full points, but use asymmetric scoring: the kitchen player must reach 11 points to win, the baseline player only 7 points. Every rally begins with the baseline player attempting a third shot drop, then playing out the point.[5][8]
Why this drill is game-changing:
- Realistic pressure: Every third shot “counts,” simulating match conditions where a bad drop costs you the point
- Tactical learning: You quickly discover which drops allow you to move forward safely vs. which get punished
- Competitive motivation: The scoring keeps both players engaged and creates urgency
Rules and variations:
- Baseline player serves or self-feeds to start each rally
- After the third shot drop, both players play out the point normally
- Kitchen player can attack any ball above net height
- Variation: Require the baseline player to successfully reach the kitchen line before the rally ends to earn the point; this reinforces the “drop and move” tactic
Progression: Once the baseline player wins consistently at 7-11, adjust the scoring to 9-11, then eventually play even (11-11) as their third shot improves.[5]
How Long Does It Take to Master Third Shot Drop Drills?
Most intermediate players achieve functional consistency (70%+ kitchen landing rate in drills) within 4-6 weeks of focused practice, dedicating 20-30 minutes per session, 3-4 times per week. True mastery—maintaining 85%+ consistency under match pressure with directional control—typically requires 3-6 months of structured practice.[1][7]
Timeline benchmarks:
- Weeks 1-2: Establish basic mechanics and net clearance (50-60% success in solo drills)
- Weeks 3-4: Add partner feeds and cross-court patterns (60-70% success)
- Weeks 5-8: Introduce pressure drills and point play (70-80% success)
- Months 3-6: Refine directional control, spin variation, and match application (80-85%+ success)
Factors that accelerate progress:
- High-quality repetition: 100+ drops per session with immediate feedback
- Video review: Recording your form reveals hidden flaws (late contact, falling back, tight grip)
- Structured progression: Following a drill sequence (solo → partner → pressure → point play) rather than random practice
Factors that slow progress:
- Inconsistent practice: Sporadic sessions (once per week or less) prevent muscle memory development
- Skipping fundamentals: Jumping to advanced drills before mastering basic solo patterns
- No feedback mechanism: Practicing without tracking success rate or identifying specific errors
Do Third Shot Drop Drills Work for Players Over 50?
Yes, third shot drop drills are especially effective for players over 50 because the shot relies on touch, timing, and strategy rather than power or speed. Many older players actually develop superior drop consistency compared to younger, more aggressive players because they focus on precision and patience.[1][7]
Why the third shot drop suits older players:
- Lower physical demand: Requires finesse and controlled movement, not explosive athleticism
- Tactical advantage: Neutralizes opponents who rely on power by forcing soft exchanges
- Injury-friendly: Smooth, low-to-high swing motion puts less stress on shoulders and elbows compared to hard drives
Modifications for older players:
- Start with shorter court distances (mid-court instead of baseline) to reduce strain
- Use slightly softer balls during practice to make contact more forgiving
- Focus on the walking-in transition drill to build confidence at multiple distances
- Prioritize the scored pressure game to develop mental toughness without excessive physical repetition
Common concern: “I don’t have the strength to reach the kitchen from the baseline.” Solution: Use more leg drive and a fuller swing arc rather than arm strength. The drop relies on lift from the legs and gravity doing the work, not muscular power.[7]
Can You Learn Third Shot Drop Drills by Yourself?
Yes, the self-feed baseline kitchen-target pattern is highly effective for solo practice and accounts for 60-70% of the skill development needed for a consistent drop. Solo drills allow you to groove mechanics, build muscle memory, and achieve high-volume repetition without needing a partner.[1]
Best solo practice routine:
- Warm-up (5 minutes): Shadow-swing the drop motion without a ball, focusing on low-to-high path and loose grip
- Self-feed sets (15 minutes): 3 sets of 30 balls from baseline to kitchen target, tracking success rate
- Variation work (5 minutes): Move target to different kitchen zones (cross-court, down-line, short, deep)
- Cool-down (5 minutes): Slow-motion drops focusing on perfect contact point and follow-through
Solo drill limitations:
- You can’t practice adjusting to varying pace, spin, or depth from an opponent
- No feedback on whether your drop would actually force an opponent to hit up
- Difficult to simulate the pressure of a live rally or moving target
When to add partner drills: Once you achieve 70%+ consistency in solo self-feed (typically 2-3 weeks), add cross-court partner feeds and pressure games to build adjustment skills and match realism.[1]
How Much Time Should I Spend Practicing Third Shot Drop Each Week?
Dedicate 60-90 minutes per week split across 3-4 sessions for fastest improvement. Each session should include 20-30 minutes of focused third shot drop work, combining solo drills, partner patterns, and pressure games. This volume provides enough repetition to build muscle memory without causing fatigue or diminishing returns.[1][7]
Sample weekly practice schedule:
- Monday (30 min): Solo self-feed baseline pattern, 3 sets of 30 balls
- Wednesday (25 min): Cross-court partner feeds, 10 minutes each wing + 5-minute scored pressure game
- Friday (20 min): Walking-in transition drill + 7-11 asymmetric point play
- Sunday (optional, 15 min): Topspin wave-motion practice or court-mapping drill
Balancing third shot practice with other skills:
- Third shot drops should represent 20-25% of your total practice time
- Also allocate time for dinking (30%), serving/returning (20%), and point play (25%)
- If your third shot is a major weakness, temporarily increase to 30-35% of practice time for 4-6 weeks
Signs you’re practicing too much: Decreased accuracy, shoulder or elbow soreness, mental fatigue during drills. If these occur, reduce volume by 30% and focus on quality over quantity.[7]
What Skill Level Should Try These Third Shot Drop Drills?
These drills are designed for intermediate players (3.0-4.0 skill level) who understand basic pickleball mechanics and want to build consistent third shot drops to advance their game. Beginners (2.5 and below) should first establish foundational skills like dinking and serving before focusing heavily on third shot drops.[1]
Skill-level breakdown:
- Beginner (2.0-2.5): Start with Pattern 1 (solo self-feed) only; focus on clearing the net and general kitchen direction
- Intermediate (3.0-3.5): Use Patterns 1-4 (solo, cross-court, walking-in, scored pressure) to build consistency
- Advanced intermediate (3.5-4.0): Add Patterns 5-7 (court mapping, topspin, asymmetric point play) for match-level precision
- Advanced (4.5+): Use all patterns as maintenance and refinement, focusing on directional control and spin variation
How to know you’re ready:
- You can consistently dink 10+ shots in a rally without errors
- Your serves and returns land in play 80%+ of the time
- You understand court positioning and the purpose of the third shot drop
- You can hit a basic forehand and backhand groundstroke with control
Progression indicator: When you achieve 75%+ success in solo drills and 60%+ in partner drills, you’re ready to integrate the third shot drop into competitive play.[1]
Are These Third Shot Drop Drills Good for Intermediate Players?
Yes, these drills are specifically optimized for intermediate players because they address the most common consistency gaps at the 3.0-3.5 level: netting drops, hitting too deep, and failing to adjust to varying pace and spin. The structured progression from solo to partner to pressure drills mirrors the skill-building path intermediate players need.[1][2]
Why intermediate players benefit most:
- High ROI: Third shot drop consistency is the single biggest factor separating 3.0 from 3.5 and 3.5 from 4.0 players
- Tactical foundation: Mastering the drop unlocks the entire transition game and allows you to compete with stronger opponents
- Confidence building: Structured drills with measurable progress (kitchen percentage, scored games) provide clear feedback
Specific drill recommendations by intermediate sub-level:
- 3.0 players: Focus on Patterns 1, 2, and 3 (solo, cross-court, walking-in) until you achieve 60%+ kitchen rate
- 3.5 players: Add Patterns 4 and 5 (scored pressure, court mapping) to build match pressure and directional control
- Approaching 4.0: Integrate Patterns 6 and 7 (topspin, asymmetric point play) to refine spin, placement, and tactical decision-making
Common intermediate mistake: Skipping the solo self-feed pattern because it feels “too basic.” Even 4.0+ players use self-feed drills as warm-up and maintenance because high-volume, low-pressure reps are irreplaceable for grooving mechanics.[1]
What Equipment Do I Need to Do These Pickleball Third Shot Drop Drills?
You need a standard pickleball paddle, outdoor or indoor pickleballs (depending on where you practice), a ball hopper or basket for solo drills, and target markers (cones, hoops, or towels) for accuracy work. No specialized equipment is required, and most drills can be done on any regulation pickleball court.[1]
Essential equipment checklist:
- Paddle: Your regular game paddle; no need for a practice-specific model
- Balls: 20-30 balls for solo drills; outdoor balls if practicing outside, indoor balls if practicing in a gym
- Ball hopper: Holds 50-80 balls and makes solo practice efficient; a large bucket works as a budget alternative
- Target markers: 3-5 cones, hula hoops, or folded towels to mark kitchen zones
Optional but helpful:
- Court tape or chalk: Mark the nine spots for the court-mapping drill
- Small whiteboard: Track scores during pressure games and record success rates
- Phone tripod: Record your form for video review and self-correction
Ball selection matters: Outdoor balls are harder and less forgiving, making them better for building precision. Indoor balls are softer and slower, which can help beginners develop confidence before transitioning to outdoor practice. If you play primarily outdoors, practice with outdoor balls to match game conditions.[1]
What Paddle and Ball Work Best for Third Shot Drop Practice?
Any control-oriented paddle with a large sweet spot and standard USA Pickleball-approved balls work well for third shot drop practice. Paddles with a fiberglass or carbon fiber face and a polymer core provide the best touch and feedback for developing soft shots.[7]
Paddle characteristics that help third shot drops:
- Weight: 7.5-8.2 ounces (mid-weight) offers the best balance of control and stability
- Core: Polymer cores dampen vibration and provide softer feel compared to aluminum or Nomex
- Face: Carbon fiber or fiberglass faces offer more texture for spin and better touch than graphite
- Grip size: Proper grip size (measure from middle finger to palm crease) prevents over-gripping and tension
Ball recommendations:
- Outdoor practice: Dura Fast 40, Franklin X-40, or Onix Pure 2 (standard tournament balls with consistent bounce)
- Indoor practice: Jugs Indoor Pickleballs or Franklin Indoor balls (softer, slower, easier to control)
- Avoid: Cheap recreational balls with inconsistent bounce or weight; they make it impossible to develop reliable feel
Does paddle choice matter much? Less than you might think. A $60 mid-range paddle with good control characteristics will serve you better for learning drops than a $200 power-focused paddle. Focus first on mechanics and consistency; upgrade equipment only after you achieve 70%+ success in drills.[7]
How Do Pros Practice Third Shot Drop Technique?
Professional players use high-volume repetition drills similar to the patterns in this guide but add layers of complexity: varying spin, hitting on the run, and integrating drops into full point-play scenarios. Pros typically dedicate 15-20% of their practice time specifically to third shot work, often starting each session with 50-100 baseline drops as a warm-up.[1][7]
Pro-level practice elements:
- Volume: 200-300 third shot drops per session, compared to 50-100 for recreational players
- Variation: Mix topspin, backspin, and flat drops; practice from different court positions and movement patterns
- Pressure: Use game-based drills (like 7-11 asymmetric scoring) where every drop matters
- Video analysis: Record and review technique after each session to identify micro-adjustments
Key difference from recreational practice: Pros focus heavily on directional control—hitting specific kitchen zones (short cross-court, deep middle, short line) rather than just “somewhere in the kitchen.” They also practice drops while moving at full speed, simulating the transition from baseline to net under match conditions.[3]
What recreational players can learn from pros:
- Start every practice session with 20-30 baseline drops as a warm-up
- Track success rate and set specific goals (e.g., 80% kitchen rate before moving to partner drills)
- Use video review at least once per month to catch form flaws
- Integrate drops into point play rather than only practicing them in isolation
FAQ
How many third shot drops should I practice per session?
Aim for 80-120 drops per session split across different drill patterns. Start with 30-40 solo self-feed drops, then add 30-40 partner-fed drops, and finish with 20-30 in pressure or point-play drills. This volume builds consistency without causing fatigue.
What’s the biggest mistake when learning third shot drops?
Hitting the ball too late (behind the body) and using too much grip pressure. These two errors cause 70% of net errors and long balls. Focus on contacting the ball out in front with a 6/10 grip pressure.
Can I practice third shot drops on a tennis court?
Yes, but mark the pickleball court dimensions with tape or chalk since tennis courts are much larger.
Content, illustrations, and third-party video appearing on GEORGIANBAYNEWS.COM may be generated or curated with AI assistance or reproduced pursuant to the fair dealing provisions of the Copyright Act, R.S.C. 1985, c. C-42. Attribution and hyperlinks to original sources are provided in acknowledgment of applicable intellectual property rights. Such referencing is intended to direct traffic to and support the original rights holders’ platforms.


